Thursday, March 20, 2014

American Girl Doll Cabinet Inspiration


I have to do this for two little girls for Christmas and do not want to lose the pictures
and the dimensions to make it happen.

So I am saving it for me here and for you for inspiration. I found it on one of the My Dolls House facebook site and this is absolutely amazing.

Made out of one sheet of plywood and it is 4 ft tall, 26 3/4 in wide, and 13 in depth.

Thursday, January 16, 2014

American Girl Doll Finds by Shopping January Clearance-- A Target Find


Baby Clearance Rack Find


I have always shopped a season ahead with end of season clearance for our family. Now that my granddaughter's have their American Girl Dolls, I am on the look out for items that can fit the dolls on clearance or be remade into inexpensive well made items to outfit the dolls.  With outfits running well over $25.00 I am on a mission to find outfits for their dolls for Valentines, Birthdays, Easter and Christmas presents.


Special Occasion Dress

I was at Target and picked up this Just for Me made by Carter Newborn Special Occasion Dress and Sweater from the clearance rack and I lucked out that a coordinating sweater to match was there as well.
A Mom blogger who blogs doll things gave me the idea of checking out the Carter Newborn Dresses last summer. I found an amazing find.  Here is the on-line link to watch for further markdowns. The picture on the Target site does not do the dress justice, it is much cuter in life.

The Carter Newborn Dress fit amazingly and was not too big around the bodice, or too tight. A perfect fit.

Front View Bodice

Back View


The sleeves on the sweater were long, but could be hemmed up an inch or I just double cuffed them and tacked them. 


I picked this one up at  (Originally $19.99 and $10.99) 50% off and the two pieces came in to just around $15.48 which is still much less expensive than an American Girl doll outfit.  I used a Target Cartwheel deal for another 15% and a Target coupon for $3.00 of $12.99 infant girl purchase off and had a $5.00 gift card from my grocery shopping and then saved another 5% with my Target Red Card.


Total paid... A grand total $5.33 plus tax.


*** A Bonus Piece that fits the doll, but will be much cuter when fashioned for the Bitty Baby as a Diaper Cover later.

Saturday, December 7, 2013

Baby Doll Fun with Nana's Carters Preemie Clothes Finds.

 
Kasja's and Mahala's babies and animals have new clothing.

More Bitty Baby Clothing Options--Walmart preemie clothing


Bitty Twins ready for Christmas....  $15.88 for both.


The price of doll clothes can start at nearly $10.00 for a very flimsy doll outfit. Walmart preemie clothes even at full price are a much better value for your money. The Walmart preemie sleepers not only fit the Bitty Baby by American Girls, but many other medium size baby dolls and stuffed animals. I regularly watch for the Preemie sleepers and clothing pieces on the clearance rack at Walmart. On Mac's wish list for presents for the Early Childhood classroom was clothing for the 14-15 inch baby dolls. I know what I will be buying... sleepers for the dollys and animals.


Right now with winter Walmart has the fleece sleepers and there are many, many prints, colors and styles in preemie sizes. I had a hard time picking some out for the classroom.


Christmas Dolls need Christmas outfits. The sleepers are $7.94 and the three piece onesie pants sets $9.44.


The Bitty Twins will have matching sleepers for $15.88. Which is a huge savings when looking at the outfits for the dolls on line.


I love this little pink 3 piece set including the angel top, onesie and the ruffled knit pants.  ($9.44)
The polka dot bear preemie sleeper caught my attention as well. ($7.94).


Preemie disposable diapers can be found at Walmart as well. We rationed diapers and eventually made our own reusable cloth diapers.  But for Holiday giving and fun a pack is a nice addition to the baby doll layette.


Walmart has preemie Child of Mine made by Carters for $7.24 as well. Boy versions.


Walmart Child of Mine Preemie Onesies $7.24


Child of Mine Matching newborn knit hats coordinate with the onesies and the sleepers. ($5.97)

At season end, I watch the clearance racks and have been known to pick up sleepers for as little as a $1.00 but most the time they clearance out at $3.00. The girl sleepers rarely make it to clearance at Walmart but the boy ones can be found for less.

Friday, December 6, 2013

Quality Alternatives To High Prices for Bitty Baby by the American Girl Doll Company--Carters Black Friday Haul


Mackie's Bitty Baby needs clothes. The American Girl Doll Clothes are not very well made and will not stand up to toddler wear and tear with repeated washings. Plus the boy choices are very limited.

I have been buying Carter's Preemie Clothing on end of the season clearance for Kasja and Mahala's Bitty Babies. Quite often I can find the outfits (sleepers and multiple piece sets for $3.99 to $5.99 less a Carter coupon). Watch Carter's clearance racks for preemie clothes which last and last.

Carter's Preemie Wear is a perfect solution for durable Doll and Stuffed Animal Clothing.

Doll clothes are not just for girls, but using Preemie outfits boys can have their own alternatives as well.


Mackie's baby is styling and the preemie clothes are fitting really well. Baby is dressed and ready for the day. 


For Black Friday Carters sale was amazing and I had $40.00 worth of Carters rewards that needed using along with a 20% off coupon. Instead of waiting for clearance, I bought Mister Mackies baby a new wardrobe which is all color coordinated with all the matching pieces.


Two pack of gowns (preemie)  and a 3 pack of matching hats (0-3 month size)


Total for 8 sets and pieces $149.00  Paid $53.47 for all this.  A Bitty Baby set can cost from $24.00 to $32.00. 


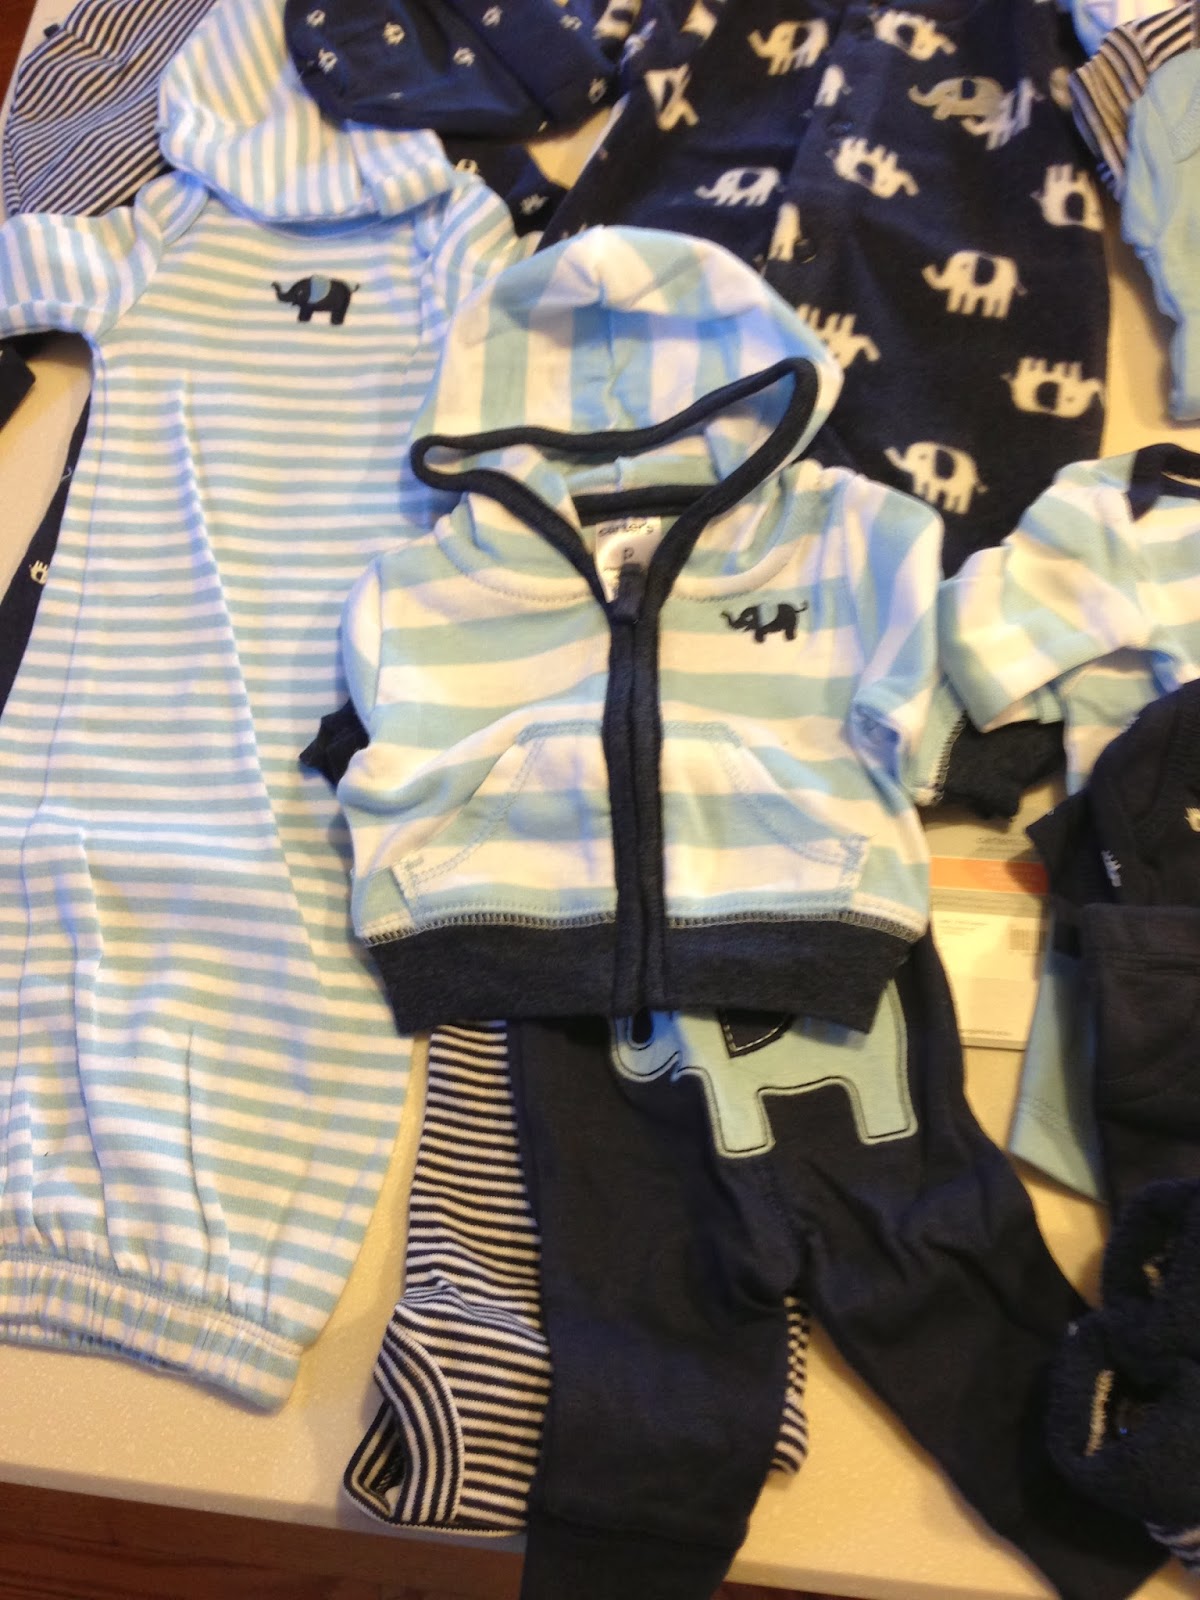
I love the little Preemie Carters Hoodie and onesie and the knit pants with the elephant on the butt! (originally $26.00 but at full price, a far superior quality deal than a Bitty Baby Outfit.  There are girls versions of the Preemie Lines as well.


Another set and they all mix and match which will create dozens of outfits.  Check out the Carter Preemie lines and clearance racks as a great way to not only find outfits for the American Girl Bitty Baby but also many 14, 15, 16 inch baby dolls and stuffed animals. 

With shopping the coordinating preemie girl and boy lines the Bitty Twins will be well outfitted and with the high prices at American Girl for the sets, you can get many coordinated pieces for the same money and it will last.

The slogan they stay little long enough until their Carter's wears out. The doll clothes will last and will be able to be passed on when they outgrow playing with them.

The end of the season clearance racks is the perfect time to not just plan ahead for the kids for next seaons clothes, but also for Christmas and Birthday presents for their dolls and animals.


Wednesday, March 2, 2011

Anny's Corner: FREE l8" Doll Pillowcase Dress Tutorial to Fit American Girl Dolls

Anny's Corner
Samantha is Ready for Spring

One of my most favorite things I used to do was to make patterns and create designs for my daughters dolls. Out of necessity, I sewed doll clothing through designer children's shops and craft fairs to help the budget. Now with time and two granddaughters I am returning to my roots.

Last night I created this outfit and with it will begin my creating kidstuff blog.
With all the pillowcase dress tutorials for the wee ones, I thought I would create one that can be made to match for their American Girl Dolls.

I created this for my granddaughters and to share for others to sew for their wee ones. Feel free to share my pattern and tutorial by linking it to my blog and giving me credit out of courtesy.


What do you need?
  • A Fat Quarter from a fabric or craft store
  • 60 inches of 5/6" inch ribbon for the tie strings
  • 3 pieces of decorative ribbon each 18" long
  • Thread
  • Safety Pin for threading the ribbon.
I found this ribbon real of bright color ribbons in the Easter dollar spot at Target this last weekend and each of the ribbon pieces were already cut just the right size for the decorative ribbon.


Making the Pattern
  • Use a 8 1/2 x 11 sheet of printer paper
  • Cut a 9 inch wide by 10 1/2 inch long rectangle
  • Measure down 1  inch from the top to mark the top casing fold line (for 5/8 inch ribbon)
  • Measure down 3 3/4 inches down from the top on each side to place a dot to mark the beginning of the side seam.
  • Measure in 1/2 on each side (left and right) to mark the seam allowances.


Cutting the Dress Pieces
  • Prewash the fat quarter and iron
  • Fold the piece of material salvage to salvage
  • Cut 2 of the rectangle pattern pieces
  • Mark the fold line and the side seam markings
  • Do not throw away your scraps set them aside for making Dolly her own matching drawstring bag. I will be posting the Tutorial for this soon. 


Begin Sewing
  • Finish the inside edges of the dress pieces. Use a serger or use a zig-zag stitch on the edges to prevent raveling. Do both sides on the long side of each rectangle.
  • Put right sides together.
  • Pin the left side seam.
  • Beginning at the side seam mark (3 3/4 inches from the top) sew a 1/2 inch seam down to the bottom.
  • Open up the pieces, press open the seam.
  • You now have one piece.


Hemming and Sewing on the Decorative Trim.

  • The pattern allows for a 1/2 inch hem.
  • There are a couple ways to hem the dress. Serge, or zig-zag the bottom edge.
  • Then press and stitch a 1/2 inch hem. Another way is to press 1/4 inches back and then fold it over again and then stitch for an enclosed hem.

Evenly stitch the decorative trim if desired. To get my ribbon even, I used an extra piece of the ribbon between the rows as I stitched them down to use as a guide. That way I had three even rows. To make it easier with matching the ribbon, I just changed the top thread color leaving the bottom thread.


Sewing the Last Side Seam
  • Put right sides together.
  • Pin the side seams together. Begin the side seam 3 3/4 inches from the top of the dress.
  • Sew the seam to the bottom.
  • Press the seam open.


Sewing the Sleeve Openings 
  • The side seams have been pressed back 1/2 inches on each side.
  • Pin 1/2 inches back on each side of each sleeve opening.
  • Sew down one side, turn and stitch across just below the beginning of the side seam and then turn and stitch up the otherside.
  • Do this on both sleeve openings.
Top Casing
  • To finish the edge of the top of the casing, you can either serge, zig-zag or press back 1/8 inches and then fold it over to make the casing.
  • Depending on the size of the ribbon used will determine how wide you make it.  I used 5/8 inch ribbon and folded it back 3/4 inches and sew the casing.


Almost Done, Thread the Tie Strings
  • Cut 2 pieces of 5/8 inch ribbon.
  • I used grograin ribbon and sealed the cuts by using a lighter to seal the edges from fraying. I very quickly, carefully ran them through the flame for less than a second.
  • Using a safety pin on one end, thread the ribbons through each casing.
  • Center the ribbon.
  • Then fold the dress front and back marking the center.
  • Tack down the ribbon at the center to keep from pulling through during play.
Total cost for me to make: $2.98
$.99 for the fat quarter at Joann Fabrics on sale, $1.00 for the decorative ribbon at Target, and $.99  for the 5/8 inch grograin ribbon (1/2 price at Hobby Lobby).

For the cost of a piece of ribbon, decorative trim and a fat quarter this Sundress Pillowcase Dress has Dolly ready for spring. Check back next week for the instructions for making this pillowcase dress with a border instead.

Thursday, February 24, 2011

Make Your Own Color Flashcards Out of Paint Chips

Pick up a variety of color paint chips at your local Hardware store to make some inexpensive flash cards. I found these cute Disney Paint Samples at Home Depot.

Punch a hole in each using the first as the pattern to make sure they are punched in the same spot on each.

I used a key chain and I added a sticker to the key chain boggle.

On the other side use a Sharpie Marker to name the color to help the kids learn to read their colors along with naming them.

These are small enough to pack for traveling on your summer road trips.

This is an easy and fun Craft project to do with the kids and all for FREE.